Build a Wi-Fi remote controlled car robot with the ESP32-CAM. You’ll be able to control the robot using a web server that displays a video streaming of what the robot “sees”. You can control your robot remotely even if it’s out of your sight. The ESP32-CAM will be programmed using Arduino IDE.

Boards compatibility: this project requires 4 GPIOs to control the DC motors. So, you can use any ESP32 camera board with 4 available GPIOs like the ESP32-CAM Ai-Thinker board or the TTGO T-Journal.
Project Overview
Before starting the project, we’ll highlight the most important features and components used to build the robot.
Wi-Fi
The robot will be controlled via Wi-Fi using your ESP32-CAM. We’ll create a web-based interface to control the robot, that can be accessed in any device inside your local network.
The web page also shows a video streaming of what the robot “sees”. For good results with video streaming, we recommend using an ESP32-CAM with external antenna.

Important: without an external antenna the video stream lags and the web server is extremely slow to control the robot.
Robot Controls
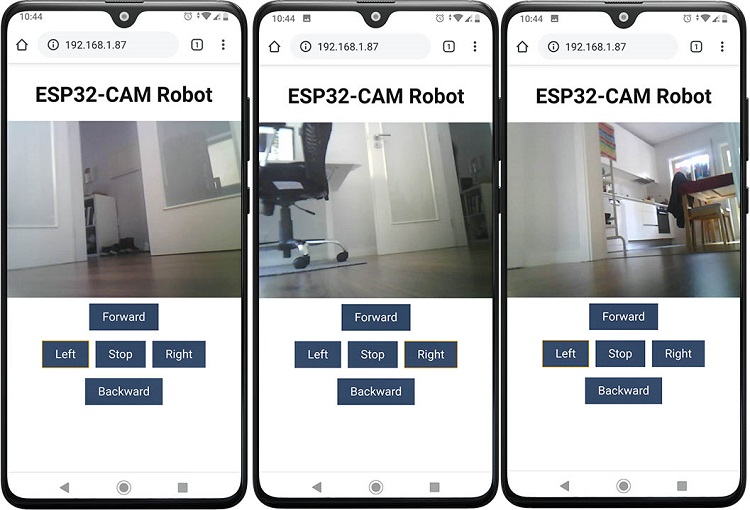
The web server has 5 controls: Forward, Backward, Left, Right, and Stop.

The robot moves as long as you’re pressing the buttons. When you release any button, the robot stops. However, we’ve included the Stop button that can be useful in case the ESP32 doesn’t receive the stop command when you release a button.
Smart Robot Chassis Kit
We’re going to use the Smart Robot Chassis Kit. You can find it in most online stores. The kit costs around $10 and it’s easy to assemble – watch this video to see how to assemble the robot chassis kit.
You can use any other chassis kit as long as it comes with two DC motors.

L298N Motor Driver
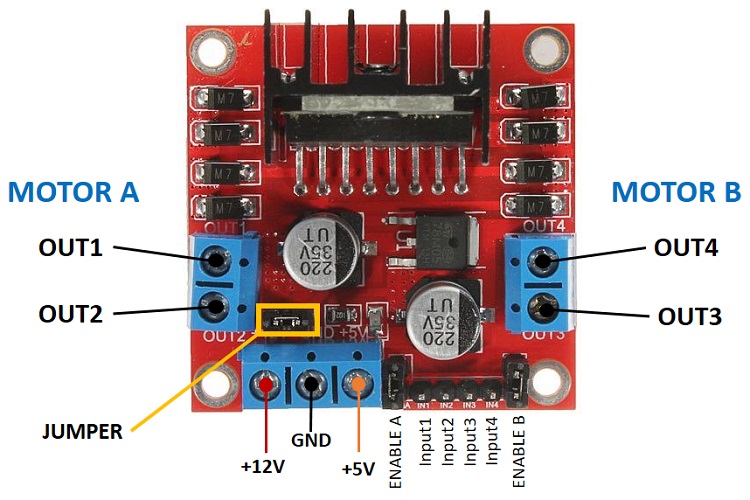
There are many ways to control DC motors. We’ll use the L298N motor driver that provides an easy way to control the speed and direction of 2 DC motors.

We won’t explain how the L298N motor driver works. You can read the following article for an in-depth tutorial about the L298N motor driver:
- ESP32 with DC Motor and L298N Motor Driver – Control Speed and Direction
Power
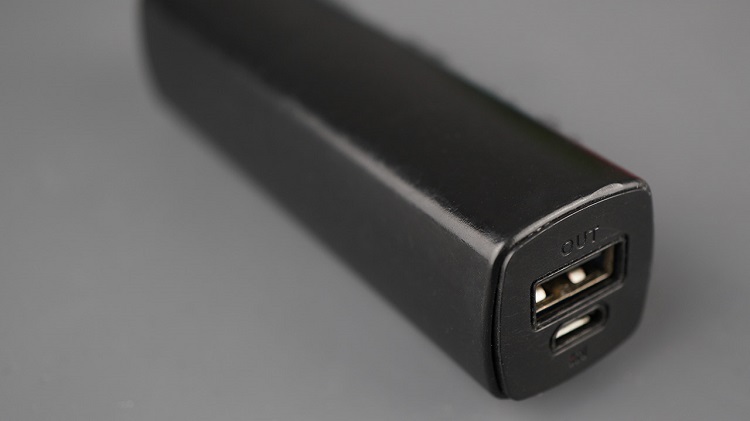
To keep the circuitry simple, we’ll power the robot (motors) and the ESP32 using the same power source. We used a power bank/portable charger (like the ones used to charge your smartphone) and it worked well.

Note: the motors draw a lot of current, so if you feel your robot is not moving properly, you may need to use an external power supply for the motors. This means you need two different power sources. One to power the DC motors, and the other to power the ESP32.
Parts Required
For this project, we’ll use the following parts:
- ESP32-CAM AI-Thinker with external antenna
- L298N Motor Driver
- Robot Car Chassis Kit
- Power bank or other 5V power supply
- Prototyping circuit board (optional)
You can use the preceding links or go directly to MakerAdvisor.com/tools to find all the parts for your projects at the best price!
Code
Copy the following code to your Arduino IDE.
/********* Rui Santos Complete instructions at https://RandomNerdTutorials.com/esp32-cam-projects-ebook/ Permission is hereby granted, free of charge, to any person obtaining a copy of this software and associated documentation files. The above copyright notice and this permission notice shall be included in all copies or substantial portions of the Software.*********/#include "esp_camera.h"#include <WiFi.h>#include "esp_timer.h"#include "img_converters.h"#include "Arduino.h"#include "fb_gfx.h"#include "soc/soc.h" // disable brownout problems#include "soc/rtc_cntl_reg.h" // disable brownout problems#include "esp_http_server.h"// Replace with your network credentialsconst char* ssid = "REPLACE_WITH_YOUR_SSID";const char* password = "REPLACE_WITH_YOUR_PASSWORD";#define PART_BOUNDARY "123456789000000000000987654321"#define CAMERA_MODEL_AI_THINKER//#define CAMERA_MODEL_M5STACK_PSRAM//#define CAMERA_MODEL_M5STACK_WITHOUT_PSRAM//#define CAMERA_MODEL_M5STACK_PSRAM_B//#define CAMERA_MODEL_WROVER_KIT#if defined(CAMERA_MODEL_WROVER_KIT) #define PWDN_GPIO_NUM -1 #define RESET_GPIO_NUM -1 #define XCLK_GPIO_NUM 21 #define SIOD_GPIO_NUM 26 #define SIOC_GPIO_NUM 27 #define Y9_GPIO_NUM 35 #define Y8_GPIO_NUM 34 #define Y7_GPIO_NUM 39 #define Y6_GPIO_NUM 36 #define Y5_GPIO_NUM 19 #define Y4_GPIO_NUM 18 #define Y3_GPIO_NUM 5 #define Y2_GPIO_NUM 4 #define VSYNC_GPIO_NUM 25 #define HREF_GPIO_NUM 23 #define PCLK_GPIO_NUM 22#elif defined(CAMERA_MODEL_M5STACK_PSRAM) #define PWDN_GPIO_NUM -1 #define RESET_GPIO_NUM 15 #define XCLK_GPIO_NUM 27 #define SIOD_GPIO_NUM 25 #define SIOC_GPIO_NUM 23 #define Y9_GPIO_NUM 19 #define Y8_GPIO_NUM 36 #define Y7_GPIO_NUM 18 #define Y6_GPIO_NUM 39 #define Y5_GPIO_NUM 5 #define Y4_GPIO_NUM 34 #define Y3_GPIO_NUM 35 #define Y2_GPIO_NUM 32 #define VSYNC_GPIO_NUM 22 #define HREF_GPIO_NUM 26 #define PCLK_GPIO_NUM 21#elif defined(CAMERA_MODEL_M5STACK_WITHOUT_PSRAM) #define PWDN_GPIO_NUM -1 #define RESET_GPIO_NUM 15 #define XCLK_GPIO_NUM 27 #define SIOD_GPIO_NUM 25 #define SIOC_GPIO_NUM 23 #define Y9_GPIO_NUM 19 #define Y8_GPIO_NUM 36 #define Y7_GPIO_NUM 18 #define Y6_GPIO_NUM 39 #define Y5_GPIO_NUM 5 #define Y4_GPIO_NUM 34 #define Y3_GPIO_NUM 35 #define Y2_GPIO_NUM 17 #define VSYNC_GPIO_NUM 22 #define HREF_GPIO_NUM 26 #define PCLK_GPIO_NUM 21#elif defined(CAMERA_MODEL_AI_THINKER) #define PWDN_GPIO_NUM 32 #define RESET_GPIO_NUM -1 #define XCLK_GPIO_NUM 0 #define SIOD_GPIO_NUM 26 #define SIOC_GPIO_NUM 27 #define Y9_GPIO_NUM 35 #define Y8_GPIO_NUM 34 #define Y7_GPIO_NUM 39 #define Y6_GPIO_NUM 36 #define Y5_GPIO_NUM 21 #define Y4_GPIO_NUM 19 #define Y3_GPIO_NUM 18 #define Y2_GPIO_NUM 5 #define VSYNC_GPIO_NUM 25 #define HREF_GPIO_NUM 23 #define PCLK_GPIO_NUM 22#elif defined(CAMERA_MODEL_M5STACK_PSRAM_B) #define PWDN_GPIO_NUM -1 #define RESET_GPIO_NUM 15 #define XCLK_GPIO_NUM 27 #define SIOD_GPIO_NUM 22 #define SIOC_GPIO_NUM 23 #define Y9_GPIO_NUM 19 #define Y8_GPIO_NUM 36 #define Y7_GPIO_NUM 18 #define Y6_GPIO_NUM 39 #define Y5_GPIO_NUM 5 #define Y4_GPIO_NUM 34 #define Y3_GPIO_NUM 35 #define Y2_GPIO_NUM 32 #define VSYNC_GPIO_NUM 25 #define HREF_GPIO_NUM 26 #define PCLK_GPIO_NUM 21#else #error "Camera model not selected"#endif#define MOTOR_1_PIN_1 14#define MOTOR_1_PIN_2 15#define MOTOR_2_PIN_1 13#define MOTOR_2_PIN_2 12static const char* _STREAM_CONTENT_TYPE = "multipart/x-mixed-replace;boundary=" PART_BOUNDARY;static const char* _STREAM_BOUNDARY = "\r\n--" PART_BOUNDARY "\r\n";static const char* _STREAM_PART = "Content-Type: image/jpeg\r\nContent-Length: %u\r\n\r\n";httpd_handle_t camera_httpd = NULL;httpd_handle_t stream_httpd = NULL;static const char PROGMEM INDEX_HTML[] = R"rawliteral(<html> <head> <title>ESP32-CAM Robot</title> <meta name="viewport" content="width=device-width, initial-scale=1"> <style> body { font-family: Arial; text-align: center; margin:0px auto; padding-top: 30px;} table { margin-left: auto; margin-right: auto; } td { padding: 8 px; } .button { background-color: #2f4468; border: none; color: white; padding: 10px 20px; text-align: center; text-decoration: none; display: inline-block; font-size: 18px; margin: 6px 3px; cursor: pointer; -webkit-touch-callout: none; -webkit-user-select: none; -khtml-user-select: none; -moz-user-select: none; -ms-user-select: none; user-select: none; -webkit-tap-highlight-color: rgba(0,0,0,0); } img { width: auto ; max-width: 100% ; height: auto ; } </style> </head> <body> <h1>ESP32-CAM Robot</h1> <img src="" id="photo" > <table> <tr><td colspan="3" align="center"><button class="button" onmousedown="toggleCheckbox('forward');" ontouchstart="toggleCheckbox('forward');" onmouseup="toggleCheckbox('stop');" ontouchend="toggleCheckbox('stop');">Forward</button></td></tr> <tr><td align="center"><button class="button" onmousedown="toggleCheckbox('left');" ontouchstart="toggleCheckbox('left');" onmouseup="toggleCheckbox('stop');" ontouchend="toggleCheckbox('stop');">Left</button></td><td align="center"><button class="button" onmousedown="toggleCheckbox('stop');" ontouchstart="toggleCheckbox('stop');">Stop</button></td><td align="center"><button class="button" onmousedown="toggleCheckbox('right');" ontouchstart="toggleCheckbox('right');" onmouseup="toggleCheckbox('stop');" ontouchend="toggleCheckbox('stop');">Right</button></td></tr> <tr><td colspan="3" align="center"><button class="button" onmousedown="toggleCheckbox('backward');" ontouchstart="toggleCheckbox('backward');" onmouseup="toggleCheckbox('stop');" ontouchend="toggleCheckbox('stop');">Backward</button></td></tr> </table> <script> function toggleCheckbox(x) { var xhr = new XMLHttpRequest(); xhr.open("GET", "/action?go=" + x, true); xhr.send(); } window.onload = document.getElementById("photo").src = window.location.href.slice(0, -1) + ":81/stream"; </script> </body></html>)rawliteral";static esp_err_t index_handler(httpd_req_t *req){ httpd_resp_set_type(req, "text/html"); return httpd_resp_send(req, (const char *)INDEX_HTML, strlen(INDEX_HTML));}static esp_err_t stream_handler(httpd_req_t *req){ camera_fb_t * fb = NULL; esp_err_t res = ESP_OK; size_t _jpg_buf_len = 0; uint8_t * _jpg_buf = NULL; char * part_buf[64]; res = httpd_resp_set_type(req, _STREAM_CONTENT_TYPE); if(res != ESP_OK){ return res; } while(true){ fb = esp_camera_fb_get(); if (!fb) { Serial.println("Camera capture failed"); res = ESP_FAIL; } else { if(fb->width > 400){ if(fb->format != PIXFORMAT_JPEG){ bool jpeg_converted = frame2jpg(fb, 80, &_jpg_buf, &_jpg_buf_len); esp_camera_fb_return(fb); fb = NULL; if(!jpeg_converted){ Serial.println("JPEG compression failed"); res = ESP_FAIL; } } else { _jpg_buf_len = fb->len; _jpg_buf = fb->buf; } } } if(res == ESP_OK){ size_t hlen = snprintf((char *)part_buf, 64, _STREAM_PART, _jpg_buf_len); res = httpd_resp_send_chunk(req, (const char *)part_buf, hlen); } if(res == ESP_OK){ res = httpd_resp_send_chunk(req, (const char *)_jpg_buf, _jpg_buf_len); } if(res == ESP_OK){ res = httpd_resp_send_chunk(req, _STREAM_BOUNDARY, strlen(_STREAM_BOUNDARY)); } if(fb){ esp_camera_fb_return(fb); fb = NULL; _jpg_buf = NULL; } else if(_jpg_buf){ free(_jpg_buf); _jpg_buf = NULL; } if(res != ESP_OK){ break; } //Serial.printf("MJPG: %uB\n",(uint32_t)(_jpg_buf_len)); } return res;}static esp_err_t cmd_handler(httpd_req_t *req){ char* buf; size_t buf_len; char variable[32] = {0,}; buf_len = httpd_req_get_url_query_len(req) + 1; if (buf_len > 1) { buf = (char*)malloc(buf_len); if(!buf){ httpd_resp_send_500(req); return ESP_FAIL; } if (httpd_req_get_url_query_str(req, buf, buf_len) == ESP_OK) { if (httpd_query_key_value(buf, "go", variable, sizeof(variable)) == ESP_OK) { } else { free(buf); httpd_resp_send_404(req); return ESP_FAIL; } } else { free(buf); httpd_resp_send_404(req); return ESP_FAIL; } free(buf); } else { httpd_resp_send_404(req); return ESP_FAIL; } sensor_t * s = esp_camera_sensor_get(); int res = 0; if(!strcmp(variable, "forward")) { Serial.println("Forward"); digitalWrite(MOTOR_1_PIN_1, 1); digitalWrite(MOTOR_1_PIN_2, 0); digitalWrite(MOTOR_2_PIN_1, 1); digitalWrite(MOTOR_2_PIN_2, 0); } else if(!strcmp(variable, "left")) { Serial.println("Left"); digitalWrite(MOTOR_1_PIN_1, 0); digitalWrite(MOTOR_1_PIN_2, 1); digitalWrite(MOTOR_2_PIN_1, 1); digitalWrite(MOTOR_2_PIN_2, 0); } else if(!strcmp(variable, "right")) { Serial.println("Right"); digitalWrite(MOTOR_1_PIN_1, 1); digitalWrite(MOTOR_1_PIN_2, 0); digitalWrite(MOTOR_2_PIN_1, 0); digitalWrite(MOTOR_2_PIN_2, 1); } else if(!strcmp(variable, "backward")) { Serial.println("Backward"); digitalWrite(MOTOR_1_PIN_1, 0); digitalWrite(MOTOR_1_PIN_2, 1); digitalWrite(MOTOR_2_PIN_1, 0); digitalWrite(MOTOR_2_PIN_2, 1); } else if(!strcmp(variable, "stop")) { Serial.println("Stop"); digitalWrite(MOTOR_1_PIN_1, 0); digitalWrite(MOTOR_1_PIN_2, 0); digitalWrite(MOTOR_2_PIN_1, 0); digitalWrite(MOTOR_2_PIN_2, 0); } else { res = -1; } if(res){ return httpd_resp_send_500(req); } httpd_resp_set_hdr(req, "Access-Control-Allow-Origin", "*"); return httpd_resp_send(req, NULL, 0);}void startCameraServer(){ httpd_config_t config = HTTPD_DEFAULT_CONFIG(); config.server_port = 80; httpd_uri_t index_uri = { .uri = "/", .method = HTTP_GET, .handler = index_handler, .user_ctx = NULL }; httpd_uri_t cmd_uri = { .uri = "/action", .method = HTTP_GET, .handler = cmd_handler, .user_ctx = NULL }; httpd_uri_t stream_uri = { .uri = "/stream", .method = HTTP_GET, .handler = stream_handler, .user_ctx = NULL }; if (httpd_start(&camera_httpd, &config) == ESP_OK) { httpd_register_uri_handler(camera_httpd, &index_uri); httpd_register_uri_handler(camera_httpd, &cmd_uri); } config.server_port += 1; config.ctrl_port += 1; if (httpd_start(&stream_httpd, &config) == ESP_OK) { httpd_register_uri_handler(stream_httpd, &stream_uri); }}void setup() { WRITE_PERI_REG(RTC_CNTL_BROWN_OUT_REG, 0); //disable brownout detector pinMode(MOTOR_1_PIN_1, OUTPUT); pinMode(MOTOR_1_PIN_2, OUTPUT); pinMode(MOTOR_2_PIN_1, OUTPUT); pinMode(MOTOR_2_PIN_2, OUTPUT); Serial.begin(115200); Serial.setDebugOutput(false); camera_config_t config; config.ledc_channel = LEDC_CHANNEL_0; config.ledc_timer = LEDC_TIMER_0; config.pin_d0 = Y2_GPIO_NUM; config.pin_d1 = Y3_GPIO_NUM; config.pin_d2 = Y4_GPIO_NUM; config.pin_d3 = Y5_GPIO_NUM; config.pin_d4 = Y6_GPIO_NUM; config.pin_d5 = Y7_GPIO_NUM; config.pin_d6 = Y8_GPIO_NUM; config.pin_d7 = Y9_GPIO_NUM; config.pin_xclk = XCLK_GPIO_NUM; config.pin_pclk = PCLK_GPIO_NUM; config.pin_vsync = VSYNC_GPIO_NUM; config.pin_href = HREF_GPIO_NUM; config.pin_sscb_sda = SIOD_GPIO_NUM; config.pin_sscb_scl = SIOC_GPIO_NUM; config.pin_pwdn = PWDN_GPIO_NUM; config.pin_reset = RESET_GPIO_NUM; config.xclk_freq_hz = 20000000; config.pixel_format = PIXFORMAT_JPEG; if(psramFound()){ config.frame_size = FRAMESIZE_VGA; config.jpeg_quality = 10; config.fb_count = 2; } else { config.frame_size = FRAMESIZE_SVGA; config.jpeg_quality = 12; config.fb_count = 1; } // Camera init esp_err_t err = esp_camera_init(&config); if (err != ESP_OK) { Serial.printf("Camera init failed with error 0x%x", err); return; } // Wi-Fi connection WiFi.begin(ssid, password); while (WiFi.status() != WL_CONNECTED) { delay(500); Serial.print("."); } Serial.println(""); Serial.println("WiFi connected"); Serial.print("Camera Stream Ready! Go to: http://"); Serial.println(WiFi.localIP()); // Start streaming web server startCameraServer();}void loop() { }Insert your network credentials and the code should work straight away.
const char* ssid = "REPLACE_WITH_YOUR_SSID"; const char* password = "REPLACE_WITH_YOUR_PASSWORD";How the Code Works
Let’s take a look at the relevant parts to control the robot. Define the GPIOs that will control the motors. Each motor is controlled by two pins.
#define MOTOR_1_PIN_1 14#define MOTOR_1_PIN_2 15#define MOTOR_2_PIN_1 13#define MOTOR_2_PIN_2 12When you click the buttons, you make a request on a different URL.
<table> <tr><td colspan="3" align="center"><button class="button" onmousedown="toggleCheckbox('forward');" ontouchstart="toggleCheckbox('forward');" onmouseup="toggleCheckbox('stop');" ontouchend="toggleCheckbox('stop');">Forward</button></td></tr> <tr><td align="center"><button class="button" onmousedown="toggleCheckbox('left');" ontouchstart="toggleCheckbox('left');" onmouseup="toggleCheckbox('stop');" ontouchend="toggleCheckbox('stop');">Left</button></td><td align="center"><button class="button" onmousedown="toggleCheckbox('stop');" ontouchstart="toggleCheckbox('stop');">Stop</button></td><td align="center"><button class="button" onmousedown="toggleCheckbox('right');" ontouchstart="toggleCheckbox('right');" onmouseup="toggleCheckbox('stop');" ontouchend="toggleCheckbox('stop');">Right</button></td></tr> <tr><td colspan="3" align="center"><button class="button" onmousedown="toggleCheckbox('backward');" ontouchstart="toggleCheckbox('backward');" onmouseup="toggleCheckbox('stop');" ontouchend="toggleCheckbox('stop');">Backward</button></td></tr> </table><script> function toggleCheckbox(x) { var xhr = new XMLHttpRequest(); xhr.open("GET", "/action?go=" + x, true); xhr.send(); } window.onload = document.getElementById("photo").src = window.location.href.slice(0, -1) + ":81/stream";</script>Here’s the requests made depending on the button that is being pressed:
Forward:
<ESP_IP_ADDRESS>/action?go=forwardBackward:
/action?go=backwardLeft:
/action?go=leftRight:
/action?go=rightStop:
/action?go=stopWhen you release the button, a request is made on the /action?go=stop URL. The robot only moves as long as you’re pressing the buttons.
Handle Requests
To handle what happens when we get requests on those URLs, we use these if… else statements:
if(!strcmp(variable, "forward")) { Serial.println("Forward"); digitalWrite(MOTOR_1_PIN_1, 1); digitalWrite(MOTOR_1_PIN_2, 0); digitalWrite(MOTOR_2_PIN_1, 1); digitalWrite(MOTOR_2_PIN_2, 0); } else if(!strcmp(variable, "left")) { Serial.println("Left"); digitalWrite(MOTOR_1_PIN_1, 0); digitalWrite(MOTOR_1_PIN_2, 1); digitalWrite(MOTOR_2_PIN_1, 1); digitalWrite(MOTOR_2_PIN_2, 0);}else if(!strcmp(variable, "right")) { Serial.println("Right"); digitalWrite(MOTOR_1_PIN_1, 1); digitalWrite(MOTOR_1_PIN_2, 0); digitalWrite(MOTOR_2_PIN_1, 0); digitalWrite(MOTOR_2_PIN_2, 1);}else if(!strcmp(variable, "backward")) { Serial.println("Backward"); digitalWrite(MOTOR_1_PIN_1, 0); digitalWrite(MOTOR_1_PIN_2, 1); digitalWrite(MOTOR_2_PIN_1, 0); digitalWrite(MOTOR_2_PIN_2, 1);}else if(!strcmp(variable, "stop")) { Serial.println("Stop"); digitalWrite(MOTOR_1_PIN_1, 0); digitalWrite(MOTOR_1_PIN_2, 0); digitalWrite(MOTOR_2_PIN_1, 0); digitalWrite(MOTOR_2_PIN_2, 0);}Testing the Code
After inserting your network credentials, you can upload the code to your ESP32-CAM board. If you don’t know how to upload code to the board, follow the next tutorial:
- How to Program / Upload Code to ESP32-CAM AI-Thinker (Arduino IDE)
After uploading, open the Serial Monitor to get its IP address.

Open a browser and type the ESP IP address. A similar web page should load:

Press the buttons and take a look at the Serial Monitor to see if it is streaming without lag and if it is receiving the commands without crashing.

If everything is working properly, it’s time to assemble the circuit.
Circuit
After assembling the robot chassis, you can wire the circuit by following the next schematic diagram.

Start by connecting the ESP32-CAM to the motor driver as shown in the schematic diagram. You can either use a mini breadboard or a stripboard to place your ESP32-CAM and build the circuit.
The following table shows the connections between the ESP32-CAM and the L298N Motor Driver.
| L298N Motor Driver | ESP32-CAM |
| IN1 | GPIO 14 |
| IN2 | GPIO 15 |
| IN3 | GPIO 13 |
| IN4 | GPIO 12 |
We assembled all the connections on a mini stripboard as shown below.

After that, wire each motor to its terminal block.
Note: we suggest soldering a 0.1 uF ceramic capacitor to the positive and negative terminals of each motor, as shown in the diagram to help smooth out any voltage spikes. Additionally, you can solder a slider switch to the red wire that comes from the power bank. This way, you can turn the power on and off.
Finally, apply power with a power bank as shown in the schematic diagram. You need to strip a USB cable. In this example, the ESP32-CAM and the motors are being powered using the same power source and it works well.
Note: the motors draw a lot of current, so if you feel your robot is not moving fast enough, you may need to use an external power supply for the motors. This means you need two different power sources. One to power the DC motors, and the other to power the ESP32. You can use a 4 AA battery pack to power the motors. When you get your robot chassis kit, you usually get a battery holder for 4 AA batteries.
Your robot should look similar to the following figure:

Don’t forget that you should use an external antenna with the ESP32-CAM, otherwise the web server might be extremely slow.
Demonstration
Open a browser on the ESP32-CAM IP address, and you should be able to control your robot. The web server works well on a laptop computer or smartphone.

You can only have the web server open in one device/tab at a time.
Wrapping Up
In this tutorial you’ve learned how to build a remote controlled robot using the ESP32-CAM and how to control it using a web server.
Controlling DC motors with the ESP32-CAM is the same as controlling them using a “regular” ESP32. Read this tutorial to learn more: ESP32 with DC Motor and L298N Motor Driver – Control Speed and Direction.
If you want to control your robot outside the range of your local network, you might consider setting the ESP32-CAM as an access point. This way, the ESP32-CAM doesn’t need to connect to your router, it creates its own wi-fi network and nearby wi-fi devices like your smartphone can connect to it.
For more projects and tutorials with the ESP32-CAM:
- Build ESP32-CAM Projects using Arduino IDE eBook
- More ESP32-CAM Projects and Tutorials…
